Why Do My Nails Look Like This?
If you’ve ever glanced down at your toenails and felt uneasy or resigned, you’re far from alone. Nail fungus, or onychomycosis, is surprisingly common. It doesn’t just bring yellowing; your nails might thicken, become fragile, and develop a rough texture. Sometimes, this leads to avoiding sandals or pools, or simply not looking at your feet at all. Despite being a small issue, it can mark a big dip in confidence.
Understanding Nail Fungus: The Silent Adversary
Healthy nails should be smooth, uniformly colored, and flexible, growing slowly but steadily. But when a fungus finds somewhere warm and moist, it can settle in. Over time, you might notice yellow or light brown nails, thickness, crumbling edges, or mild separation from the nail bed. Pain is not always present, making this easy to overlook early on. Often starting in one nail, the fungus can spread if your feet remain in a humid, closed environment. Fungi thrive on consistency—and ironically, defeating them requires a new kind of consistency: steady, mindful care.
The Fungus Buster Ritual: A Reasoned, Home-Based Approach
Known as the “Nail Fungus Buster,” this isn’t a miracle cure but a traditional, natural care process that supports nail health, using simple, accessible ingredients. Rather than resorting to harsh products, this routine focuses on regular cleaning, controlled dryness, gentle acidity, and plant-based substances with potential antifungal properties—such as tea tree oil and garlic. Remember: this should not replace medical evaluation or prescribed treatment, especially in the presence of pain, redness, pus, or diabetes. However, for mild or early cases, many turn to this method for additional support.
Common Benefits Noted with Consistency
- Greater Control, Reduced Embarrassment: Beginning a simple daily ritual—soaking, thorough drying, and spot treatment—can quickly instill a sense of control, which encourages continued care.
- Visibly Cleaner Nails: Apple cider vinegar is used for its acidity, making the environment less inviting for fungus. While it may not eradicate every problem alone, it can help the nail’s surface appear cleaner and less dull.
- Less Trapped Moisture: The real secret isn’t in any single ingredient, but in consistently keeping feet dry. Towels, air drying, clean socks, and ventilated shoes help ensure an unfriendly environment for fungus to linger.
- Soothed Skin Around the Nail: Coconut oil is often used for its calming, hydrating properties, balancing out the potentially drying effects of vinegar or tea tree oil. This helps maintain comfort and makes it easier to stick with the routine.
- Improved Odor and Freshness: Regular soaking and drying, especially coupled with vinegar, can help reduce unpleasant odors, suggesting the area is less inviting for fungal growth.
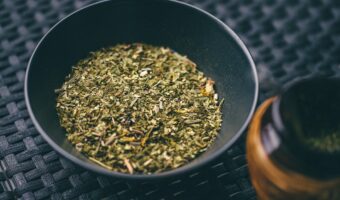
- Careful, Targeted Application of Tea Tree Oil: Known for its promising antimicrobial qualities, tea tree oil should always be diluted before use, especially on sensitive skin. With patience, some notice reduced yellowing over time.
- Nails Less Prone to Breaking: Gentle nail trimming, filing, and cleaning beneath the edges are key steps. Removing damaged portions helps new nails grow healthier, but remember: toenails grow very slowly, so patience is essential.
- Gradual Growth and Clearer Base: Improvements tend to begin at the base as the nail grows out. Full recovery may take months, so look for small positive changes.
- Breaking the Cycle: Perhaps most important is the habit of ongoing foot care: drying well, wearing ventilated shoes, clean socks, and avoiding walking barefoot in moist public areas. These habits can dramatically reduce chances of recurrence.
Most Popular DIY Fungus Buster Recipes
Before you start, three important safety tips: always test on a small skin area, avoid open wounds, and dry feet thoroughly after every step.
1. Tea Tree Oil + Apple Cider Vinegar + Coconut Oil Blend
This topical mix combines vinegar for acidity, tea tree oil (diluted) for potential antifungal support, and coconut oil for moisture and comfort. Apply for a limited time and monitor skin response.
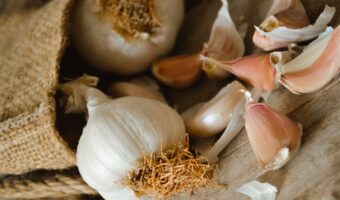
2. Garlic and Baking Soda Paste
Raw garlic contains allicin, linked to certain antimicrobial effects. Baking soda helps adjust pH. Be cautious: sensitive skin may become irritated, so never overuse.
3. Apple Cider Vinegar Foot Soak
Soak feet briefly in warm (not hot) water mixed with apple cider vinegar. Keep sessions short and always finish with complete drying of feet and nails.
Ingredients at a Glance
- Tea Tree Oil: Antimicrobial potential, strong aroma, can irritate if undiluted
- Apple Cider Vinegar: Creates an acidic, less hospitable environment for fungi; fresh, tangy feel, avoid if the skin is cracked
- Garlic: Contains allicin, notable aroma, can irritate or burn sensitive skin
- Coconut Oil: Soothing, hydrating base, do not use if allergic
- Baking Soda: Supports pH balance; drying, may irritate if over-applied
Routine Steps and Frequency
- Soak: Daily or up to 5–6 days per week for gentle cleaning. Shorten time if you feel any burning.
- Comprehensive Drying: Always—essential for reducing moisture.
- Targeted Application: 1–2 times per day; if irritation develops, dilute further or pause.
- Trimming and Filing: Weekly, to remove damaged nail tissue, but stop if painful.
- Shoe Hygiene: 2–3 times weekly—air out shoes and switch socks regularly to avoid persistent odor and reinfection risk.
Some people notice aesthetic changes within 2 to 4 weeks, but keep in mind that full renewal may take several months, depending on nail growth. The most common reason for failure is ignoring basic hygiene: wearing the same closed shoes all day, leaving feet damp, and skipping thorough drying after showers. Staying committed to these healthy foot habits is the true foundation of the Nail Fungus Buster’s effectiveness.
Note: If symptoms persist, worsen, or are accompanied by pain, redness, pus, or underlying conditions like diabetes, consult a healthcare professional before continuing home treatment.